In a slight moment of madness... I signed myself up to another two cake weekend recently. Normally two-cake weeks kill me on top of the 9-5 slog, but I have to say that a combination of Sunday deliveries and fun designs for me to work on (/copy) meant I really enjoyed these cakes!
This post is to tell you about cake number 1 - a rainbow sponge coated with pink, white polka dots and edible Minnie Mouse Ears and bow!
If you haven't already noticed this about me... I love Disney.
What I really want to talk about is the rainbow sponge. I have done coloured sponges before, my first post has a (actually quite similar cake), consisting of green, yellow, pink and purple layers with matching dots and a bow on top! So being asked to bake a rainbow... and then put it in a Disney casing sounded like a lot of fun to me!
Rainbow cakes look so effective and difficult, but psssst, they're just as easy as your regular bake. And dare I say it, with the reduced baking time of each layer, slightly easier.
All you're gonna need is your ingredients, plus two equal sized tins, plus 6 colours. NOTE: Yes a rainbow has 7 colours, but in my cakey opinion... when a cake is purple, it's purple... indigo and violet are by the by!
HOW TO BAKE A RAINBOW:
In total over two mixes, and six bakes I used 14 eggs, 750g unsalted butter, 750g sugar, 750g self-raising flour, and a decent vanilla extract (I use Neilsen Massey) - plus gel colours, I use Wilton's as a small amount gives you a vivid colour. Don't get the water-y supermarket food colourings as you will need lots, not get the colour depth and be adding lots of moisture to your cake mixture. For this bake I used two 8" cake tins.
MIX 1
Preheat oven to fan 150c, grease and line your tins ready.
Using 375g butter (lurpak) at room temperature, beat with an electric mixer until creamed together, pale and fluffy.
Then add 6 eggs into your mix - I do mine 1 egg at a time, adding a teaspoon of flour after each egg to stop any splitting. It's also a good idea to crack your eggs into a pyrex jug then tip them into your mix as it's easier to rescue egg shell from a clear jug than a bowl with cake mix in it! Pop in 1 tsp of vanilla essence.
Once eggs are combined with the butter and sugar, slowly add your sifted self-raising flour (I use McDougalls because I don't have to sift it - yippee!), continue to mix until smooth, and all the ingredients are combined.
Now pop a large mixing bowl on the scales and transfer your cake mix to get the total weight. Divide this by 3, then using three smaller bowls (standard ones you put your cereal in) split the mixture into three.
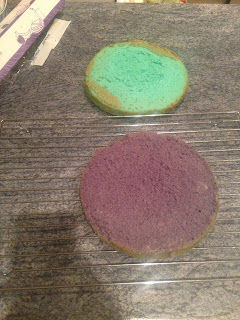
Using your gel colour add a small piece into the cake batter and mix in with a metal spoon - don't beat it too hard or you will knock out all the air you whisked up. Colour the first three portions Red, Orange and Yellow.
Transfer the Red and Orange batter into lined and greased baking tins. Place on the same shelf in the oven. Clingfilm your Yellow batter while you start to make up mix 2.
Bake for about 40minutes, to test the cakes are cooked use a skewer to poke to the bottom of the mix, if it comes out clean you're done. If it's claggy or has wet cake mix on it give it 2-3minutes extra and test again. The sponge should also spring back to shape if you prod the top with your finger.
Transfer to a cooling rack.
MIX TWO
Repeat all of the above, this time when you split your sponges colour them Green, Blue and Purple.
Bake 1 of mix two will be your yellow mix from before, this may need a little bit of a stir with a metal spoon as it has been sat at room temperature. Pop this and your Green batter in the oven for 40 minutes.
Finally pop Blue and Purple in the oven for 40 minutes - again the mixes may need a little stir to reawake them after sitting at room temperature.
THEN
Once your sponges are all baked and cooled, level them off with a serrated knife or if you can get hold of one a cake leveller. For the cake I made it was buttercreamed and iced, but rainbow cakes can look fab just coated in butterceam and rainbow sprinkles.
BUTTERCREAM
Buttercream works on a ratio of 1:2 - if you have 50g of butter (room temp), you will have 100g of icing sugar. For an 8 inch cake use an electric whisk to beat 250g butter with 1 tsp vanilla essence. Once pale sift in 500g icing sugar. Do this bit by bit! When I say this I mean 2-3 tablespoons at a time, or you will be coated in icing sugar. Once all in beat on a high speed for 1 minute until the icing sugar is stiff and spreadable.
CONSTRUCTION
Using a spatula or knife stack your cakes with a layer of buttercream between each layer - for a rainbow you will start at the bottom Purple, Blue, Green, Yellow, Orange, Red.... but why not mix it up or do an upside down rainbow? You can even use other colours.
Once all stacked coat the sides of the cakes and the top in buttercream and douse in RAINBOW SPRINKLES!
And here's how rainbow cakes look - fun, impressive, and yum!


No comments:
Post a Comment